

Yoga for Balance After 60: 12 Supported Poses, Simple Self-Checks, and an 8-Week Plan
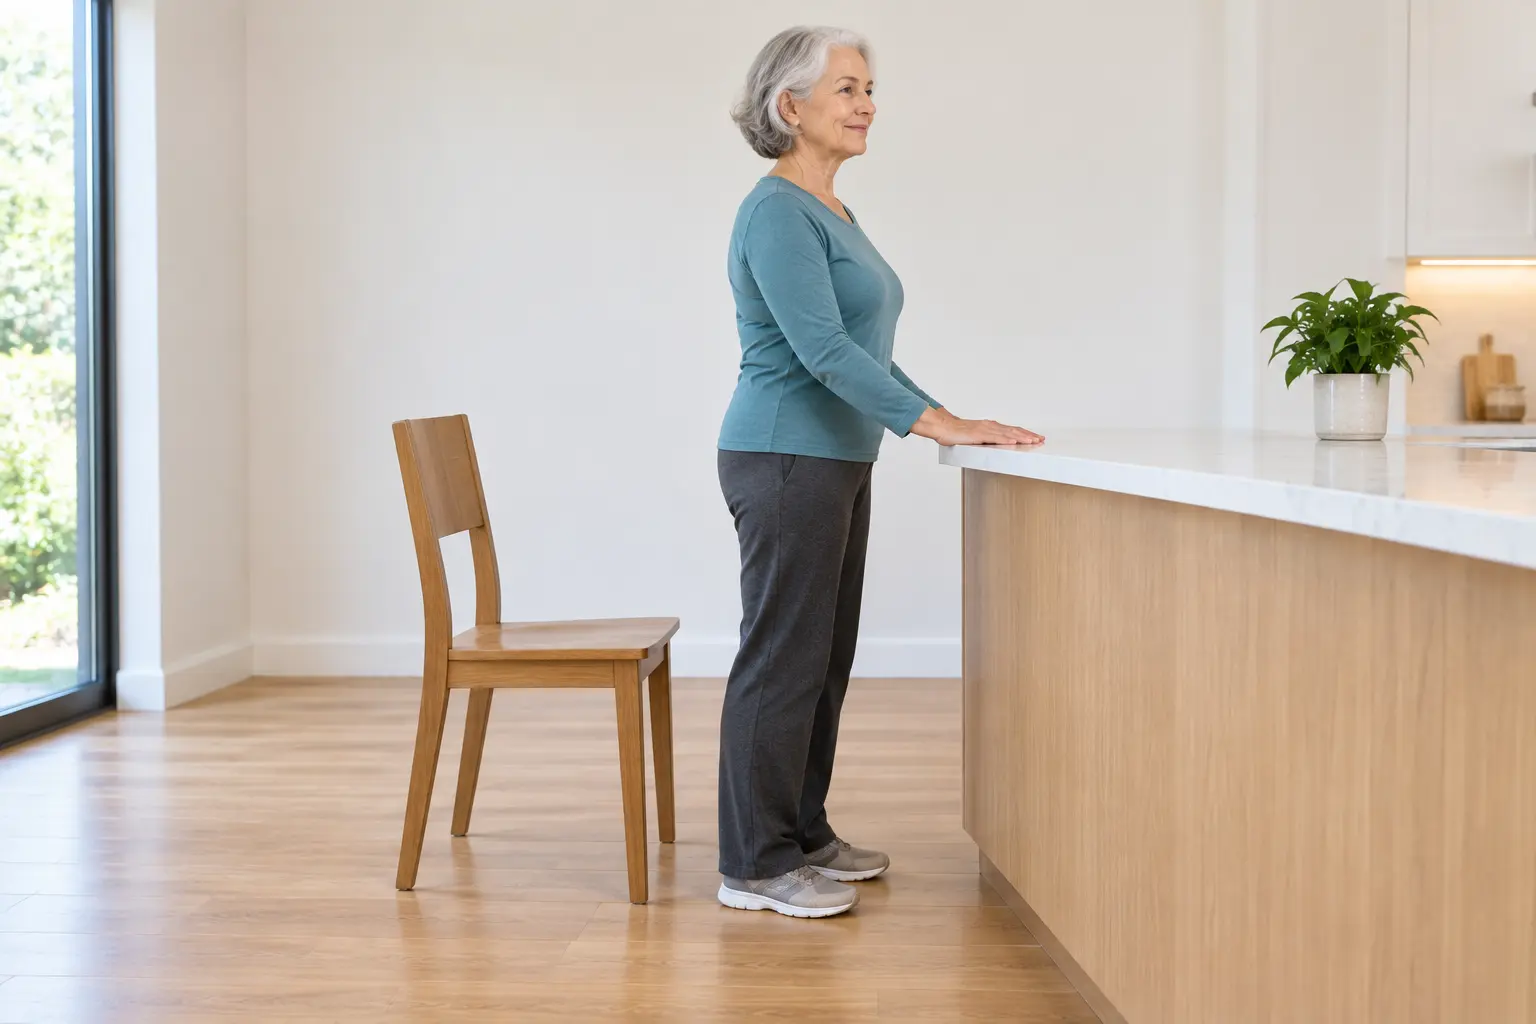
Feeling a little less steady than you used to is common as we get older. The good news is that balance is a skill you can keep training. This guide shows you how, using gentle standing yoga poses you do while holding on to a kitchen counter or a sturdy chair.
This guide is free, and you do not need to sign up for anything. It includes:
- Why balance changes with age, and what the research says helps
- Two simple self-checks from the CDC that you can share with your doctor
- 12 supported balance and leg-strength poses, each with easier and harder options
- A 15-minute routine to do 3 times a week
- An 8-week plan to build up slowly
- Quick home safety tips, and when to see a physical therapist
If you would rather stay seated, or standing is hard for you right now, start with our chair yoga for seniors guide. It covers seated poses in detail. This page focuses on standing.
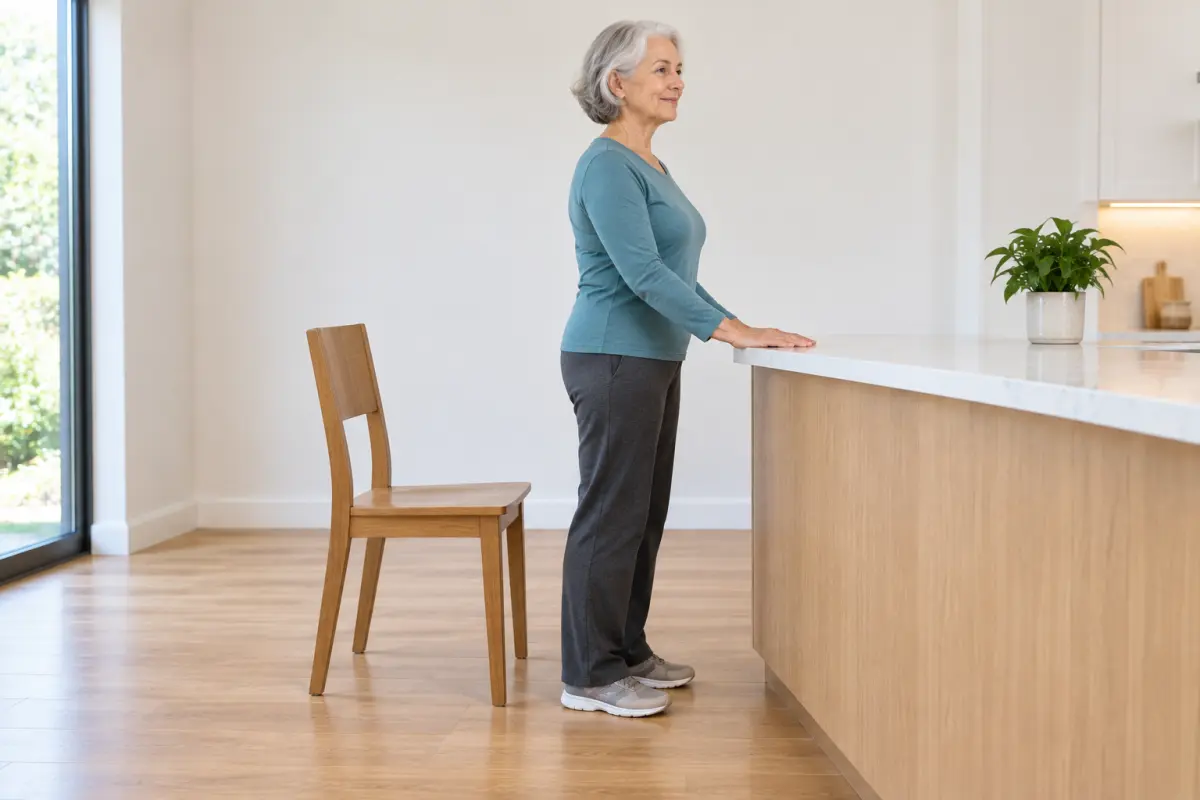
Reviewed by the YogaMag editorial team against the sources listed below, in line with our editorial policy. This page has not been reviewed by a doctor or physical therapist.
Who this guide is for
This guide is written for adults 60 and older, and for family members and caregivers who help them stay active. It may suit you if:
- You can stand and walk on your own, with or without a cane
- You want to feel steadier on stairs, curbs, or uneven ground
- You are new to yoga, or coming back after a break
- You want a short routine to do at home
Why balance changes with age
Good balance depends on several body systems working together. Harvard Health explains that, as we age, changes in flexibility, muscle strength and power, body sensation, reflexes, and even mental function all add up. Muscles get weaker, joints get stiffer, and signals between the body and brain travel a bit more slowly.
That matters because falls are common. The CDC reports that more than 1 in 4 older adults falls each year, but less than half tell their doctor. Falling once doubles your chance of falling again. Falls are also the most common cause of traumatic brain injury in older adults.
The CDC also says falls can be prevented. Dr. Brad Manor, quoted by Harvard Health, puts it simply: "Balance is definitely a use-it-or-lose-it skill."
What helps: what the research says
Balance activities are part of the CDC's activity guidelines. For adults 65 and older, the CDC recommends activities to improve balance, such as walking heel-to-toe or standing up from a seated position. It also recommends at least 2 days a week of muscle-strengthening activity and about 150 minutes a week of moderate activity, like brisk walking.
Leg-strength and balance exercise is a key part of fall prevention. The CDC lists "exercises that make your legs stronger and improve your balance" as one of the main steps older adults can take to prevent falls. A 2019 Cochrane review of exercise in older people living at home found that balance and functional exercises (moves like standing up from a chair or stepping) lowered the rate of falls by about 24%. That review rated this evidence as high certainty.
Yoga can improve balance and mobility. A 2016 review in Age and Ageing pooled 6 trials with 307 people aged 60 and over. Yoga-based exercise led to a small improvement in balance and a medium improvement in mobility. A larger 2019 review of 22 trials found that, compared with no exercise, yoga improved balance, leg strength, and lower-body flexibility in older adults. The National Center for Complementary and Integrative Health (NCCIH) also notes newer studies supporting a helpful effect of yoga on balance in older adults living at home.
What we do not know yet: The 2016 review authors said more research is needed to show whether yoga by itself lowers falls. So we do not claim it does. Instead, the poses in this guide are built around the same kinds of moves that have strong fall-prevention evidence: rising from a chair, rising onto your toes, shifting your weight, and standing on one leg with support. Harvard Health describes a balance program with three of these exact moves (squats, heel raises, and one-legged standing) that improved balance skills in adults aged 60 to 80.
Exercise is one part of the picture. The CDC also advises having your medicines reviewed, getting a yearly eye exam, and making your home safer. See the section on home safety below.
Talk to your doctor first if…
NCCIH says older adults may need to be especially careful with yoga, and that people with health conditions should talk with their health care provider. It lists balance problems, severe high blood pressure, knee or hip injuries, and glaucoma among the conditions that may mean changing or skipping some poses. Please check with your doctor or physical therapist before you begin if you have:
- Fallen in the past year, or feel afraid of falling. Ask about your fall risk and whether a physical therapist should guide you first.
- Dizziness or vertigo. Find out the cause before doing balance work. Turn your head slowly and skip any position that brings it on.
- Lightheadedness when you stand up. Cleveland Clinic explains that a sudden drop in blood pressure when you stand (orthostatic hypotension) affects many people over 60. Medicines for high blood pressure, heart disease, Parkinson's disease, and depression can raise the risk.
- Osteoporosis or low bone density. The Bone Health and Osteoporosis Foundation advises people with spinal bone loss not to bend forward from the waist and to avoid extreme twisting. In this guide, keep your back long and your chest lifted in every squat and sit-to-stand.
- A hip or knee replacement. Ask your surgeon or therapist which movements are allowed and for how long. Hip precautions differ by surgical approach.
- Heart or lung disease, diabetes with numb feet, or any new symptom. Ask what level of activity is safe for you.
Set up a safe practice spot
- Use a kitchen counter or a heavy, stable table. It should not slide or tip when you lean on it. A sturdy chair with its back pushed against a wall also works for most poses.
- Put a sturdy chair behind you. If you get tired or wobbly, you can sit down right away.
- Clear the floor. Move rugs, cords, pets' toys, and anything else you could trip on.
- Wear supportive, flat shoes with non-slip soles, or go barefoot on a non-slip floor. Avoid socks on hard floors.
- Have good light. You should be able to see your feet clearly.
- Keep at least one hand on the counter, always, unless the pose says otherwise. The "harder" options lighten your grip, but your hand should hover just above the counter, ready to grab it.
- Practice when someone else is home, especially at first.
Stop right away if…
Harvard Health lists chest pain, shortness of breath, lightheadedness, and joint pain as warning signs to stop exercising. Stop, sit down in your chair, and call your doctor if you feel:
- Chest pain, pressure, or tightness
- Shortness of breath that does not settle quickly
- Dizziness, lightheadedness, or the room spinning
- Sharp or worsening joint pain
- New numbness, tingling, or weakness
If symptoms are severe or do not go away when you rest, call 911.
Two simple self-checks
These two checks come from the CDC's STEADI program, a set of tools doctors and clinics use to check fall risk. They are not a diagnosis and not a score of your health. They simply give you a starting point you can track over time and share with your doctor.
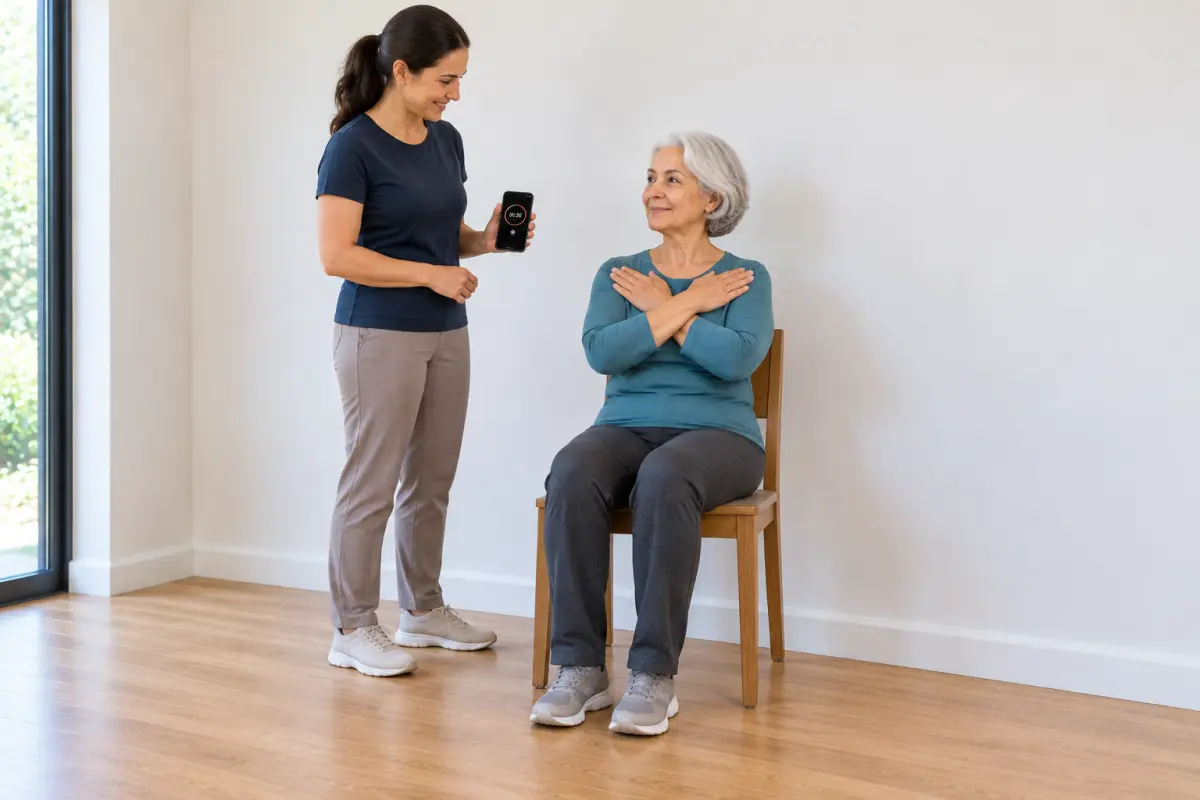
Safety first: The CDC instructions for both checks say the person giving the test should stand next to you. Only do these with a helper beside you, in front of a counter, with a clear floor. Skip them if you have fallen recently or feel dizzy, and ask your doctor or physical therapist to do them with you instead.
Check 1: The 30-second chair stand (leg strength)
The CDC uses this to check leg strength and endurance.
- Use a sturdy chair without arms, with its back against a wall.
- Sit in the middle of the seat with your feet flat on the floor.
- Cross your arms at the wrists and rest your hands on the opposite shoulders.
- When your helper says "Go," stand all the way up, then sit all the way back down.
- Keep going for 30 seconds. Your helper counts how many times you stand fully up.
If you need your arms to stand up, stop. That is useful information, too. Write it down.
The CDC form compares the number with averages for your age and sex, and says a below-average number points to a higher risk of falling. Rather than judging your own result, write down your number and the date and bring it to your next doctor visit.
Check 2: The 4-stage balance check (standing balance)
The CDC uses this to check standing balance. You try four foot positions, each a bit harder. Keep your eyes open. You may hold your arms out or move your body to stay balanced, but do not move your feet.
- Feet side by side, touching.
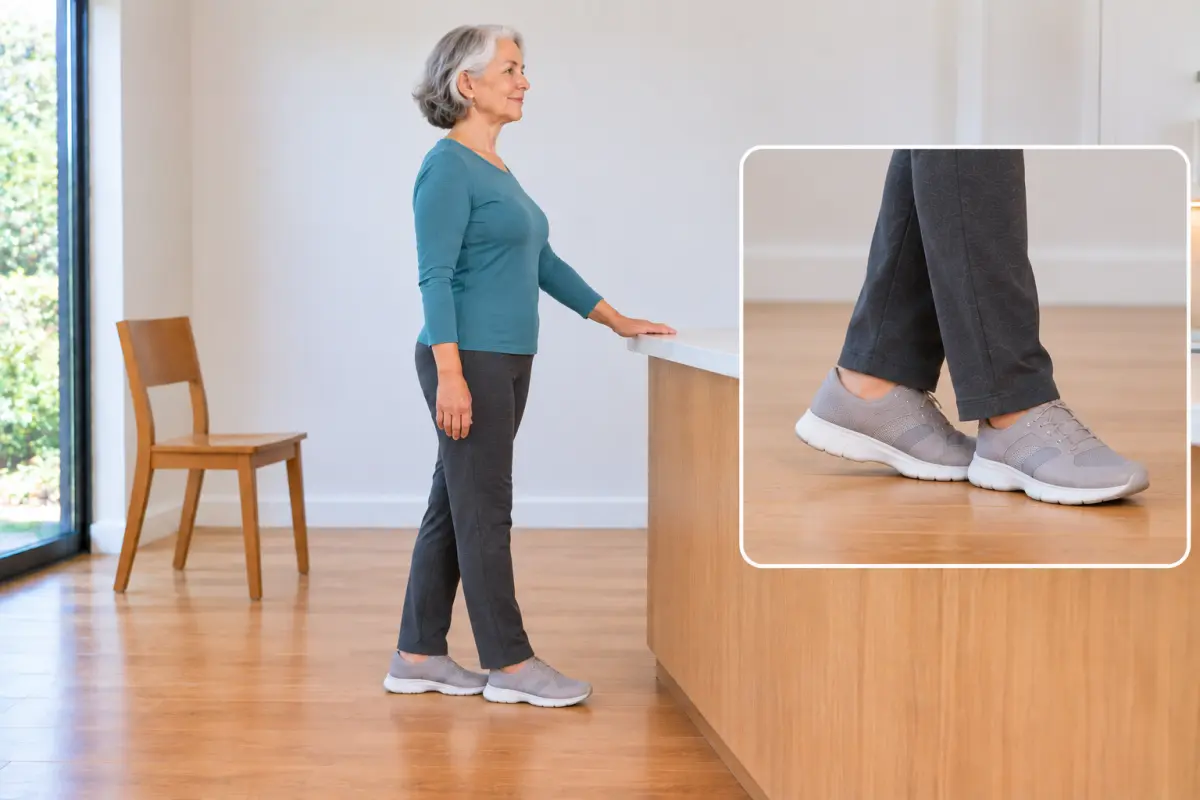
- Instep to big toe: Place the inside of one foot so it touches the big toe of the other foot.
- Heel to toe (tandem stand): Place one foot directly in front of the other, heel touching toe.
- Stand on one foot.
Have your helper stand next to you and hold your arm while you get into each position. When you are steady, they let go, stay close, and time you. If you hold a position for 10 seconds without moving your feet or grabbing support, move on to the next one. If not, stop there.
The CDC notes that an older adult who cannot hold the heel-to-toe stand for at least 10 seconds is at higher risk of falling. If that is you, it is a good reason to talk with your doctor about physical therapy or a fall prevention program.
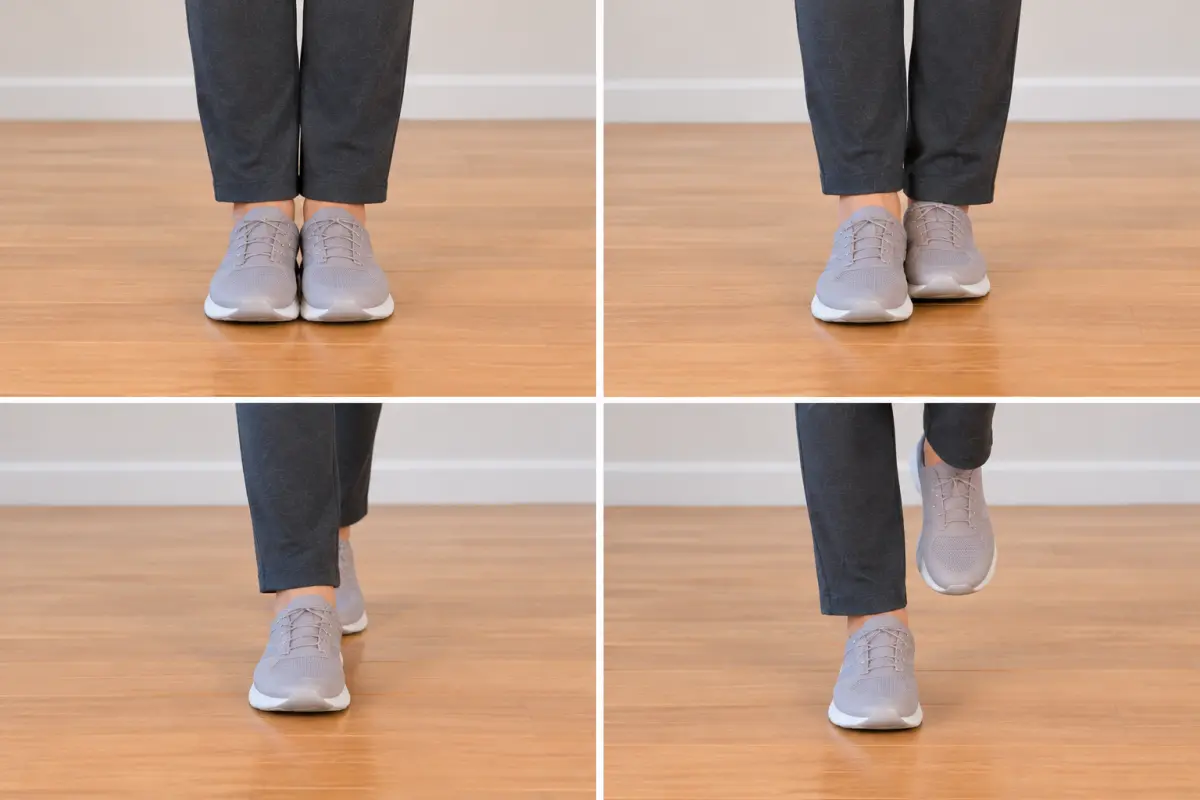
Left to right, top to bottom: feet together; instep to big toe; heel to toe; one foot.
Track it, don't judge it. Repeat both checks every 4 weeks with your helper. Write down the date and your results. Bring the list to your doctor. It is your own record, not a grade.
How to read the poses
Each pose below includes:
- Steps to get into and out of the pose
- How long: breaths or repetitions
- Easier and harder versions
- Skip if: when to leave it out or ask first
Breathe slowly through your nose if you can. Never hold your breath. Move only as far as feels comfortable. A little muscle effort is good; pain is not.
The 12 poses
The photos on this page are AI-generated illustrations. We checked each one against the written steps.
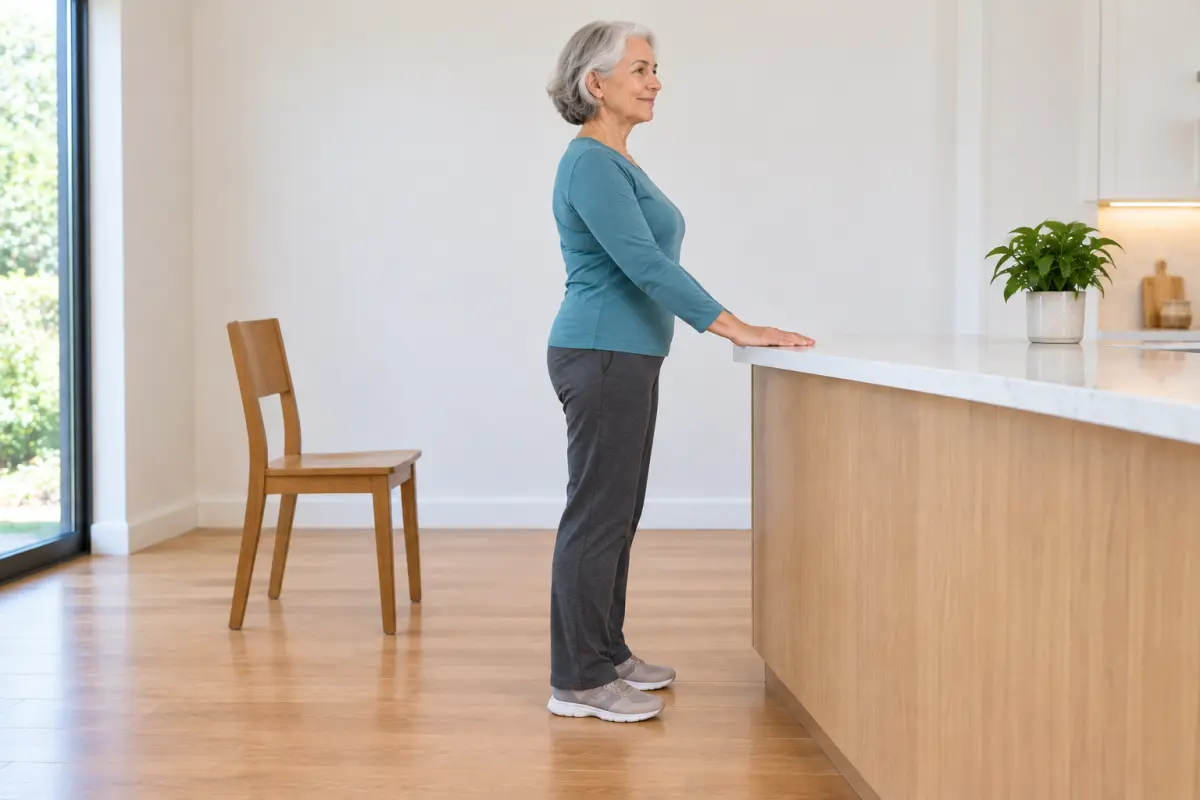
1. Mountain Pose at the counter
This is the starting position for every standing pose. It teaches you to stand tall with your weight even. See also our Mountain Pose guide.
- Stand facing the counter, about a forearm's length away. Rest both hands on the countertop.
- Place your feet hip-width apart, toes pointing forward.
- Spread your toes and feel your weight on your heels, big toes, and little toes.
- Lengthen up through the top of your head. Let your shoulders relax down.
- Breathe slowly.
How long: 5 slow breaths.
Easier: Stand with your back near a wall as well as holding the counter.
Harder: Lift your hands so they hover just above the counter.
Skip if: You feel lightheaded standing still. Sit and rest, then try again.
2. Side-to-side weight shifts
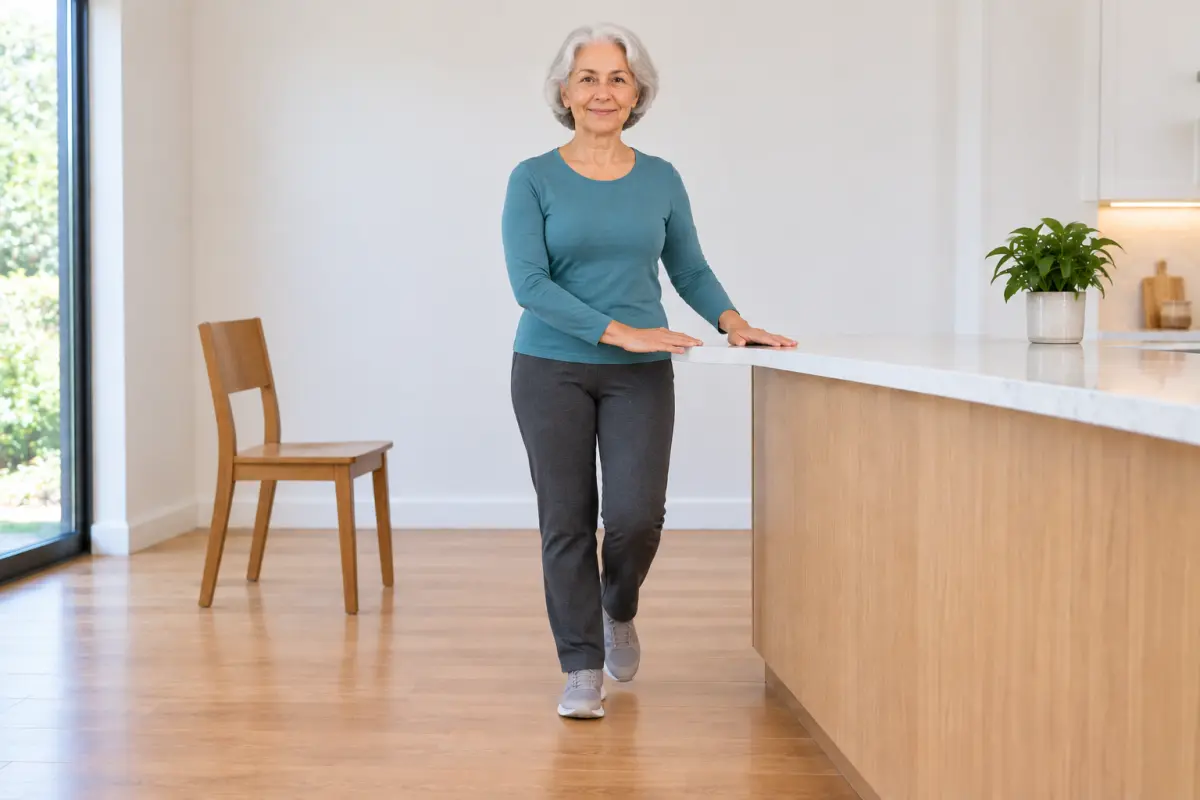
Shifting weight is how we walk and step. This trains you to move your weight over one foot with control.
- Start in Mountain Pose, both hands on the counter.
- Slowly shift your weight onto your right foot, keeping both feet on the floor.
- Pause for one breath. Feel your right foot carry more of your weight.
- Shift slowly back to center, then to the left.
How long: 5 shifts each side.
Easier: Make the shift smaller.
Harder: As you shift right, let your left heel lift slightly. Then let the left foot hover just off the floor for one breath.
Skip if: You have sharp hip or knee pain when standing on one side.
3. Heel raises
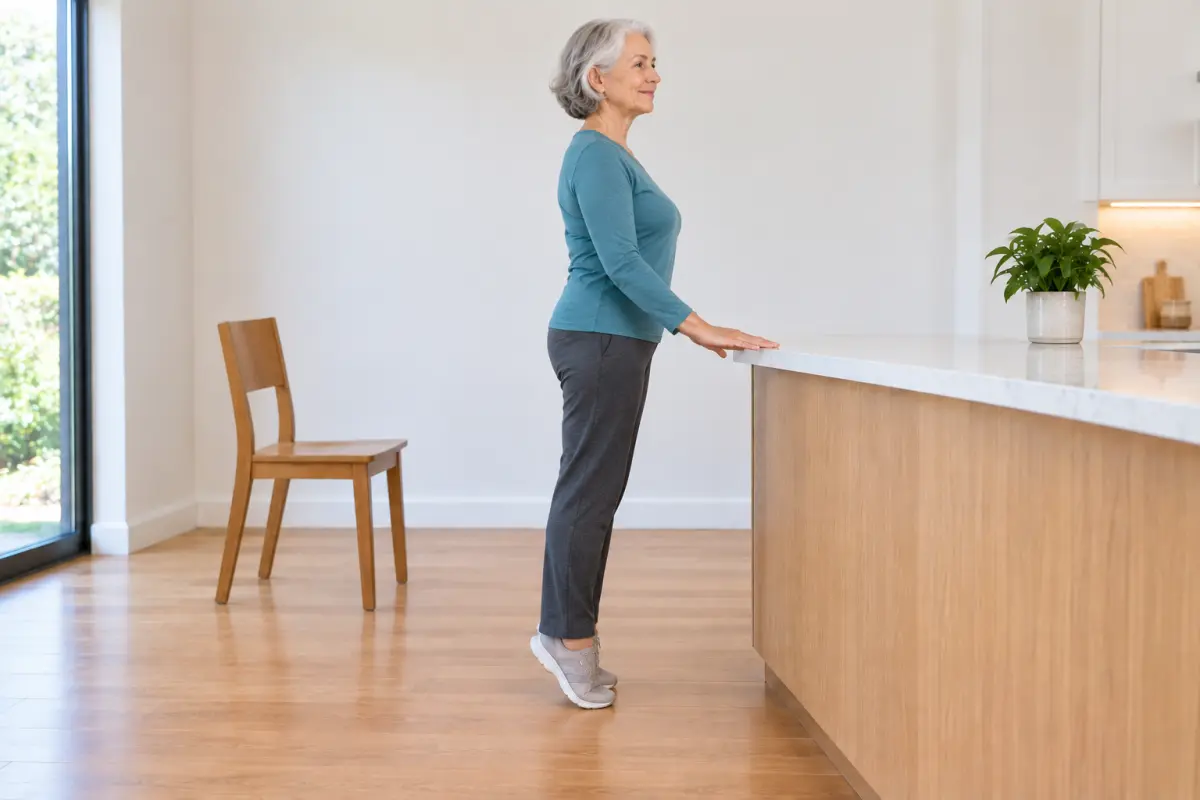
Calf strength helps you push off when you walk and catch yourself when you trip. Heel raises are part of the balance program described by Harvard Health.
- Stand facing the counter, both hands on it, feet hip-width apart.
- Slowly rise onto the balls of your feet.
- Hold for 1 to 2 breaths.
- Lower your heels slowly to the floor.
How long: 8 to 10 raises.
Easier: Rise only a little.
Harder: Hold at the top for up to 10 seconds, or use the light touch of just your fingertips.
Skip if: You have foot or Achilles pain, or poor feeling in your feet.
4. Toe lifts
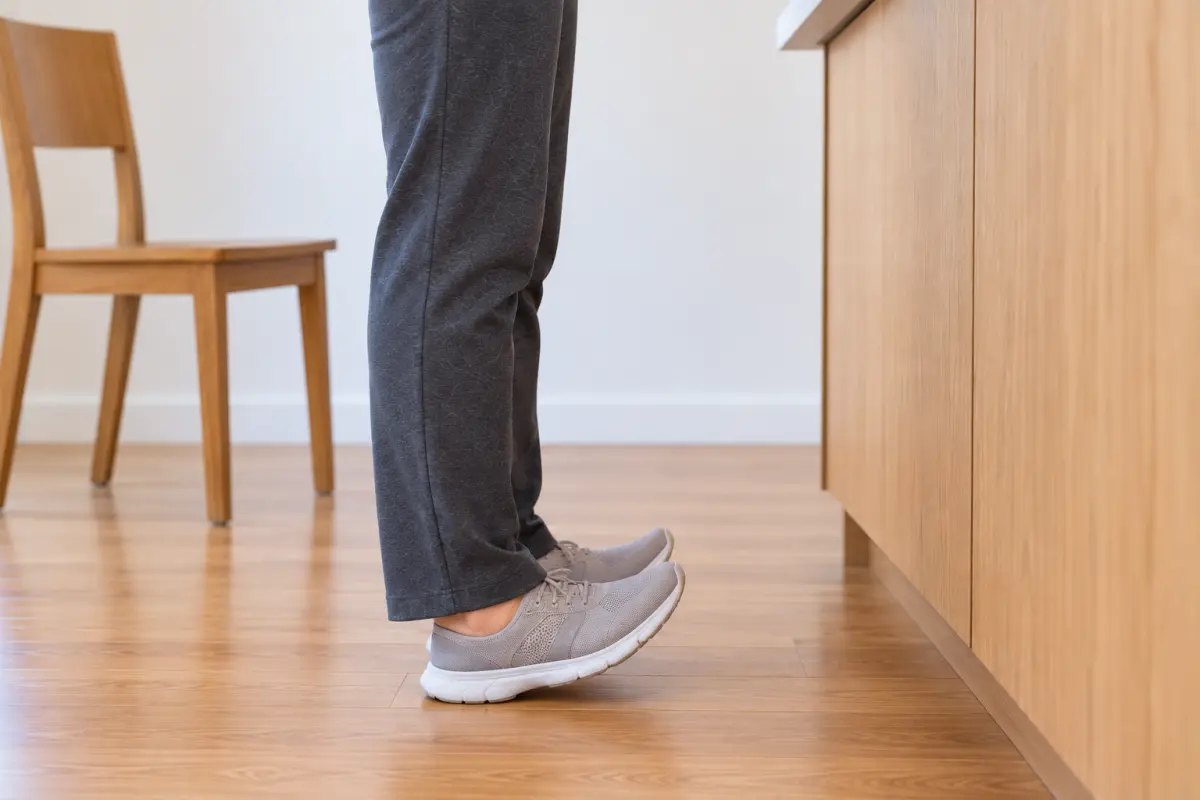
Lifting the front of your feet strengthens the shin muscles that help you clear your toes when you walk.
- Stand at the counter, both hands on it.
- Keep your heels on the floor and lift your toes and the front of your feet.
- Hold for one breath, then lower.
How long: 8 to 10 lifts.
Easier: Do this sitting in your chair.
Harder: Alternate: heel raise, lower, toe lift, lower. Move slowly.
Skip if: Leaning back makes you feel unsteady. Do it seated instead.
5. Sit-to-stand (Chair Rise)
The CDC names "standing from a sitting position" as a balance activity. It is also one of the most useful everyday strength moves.
- Sit near the front of a sturdy chair with its back against a wall. Feet flat, hip-width apart, just behind your knees.
- Lean forward slightly from your hips, keeping your back long and chest lifted.
- Press through your feet and stand all the way up.
- Pause and stand tall.
- Reach back with your legs until they touch the chair, then sit down slowly with control.
How long: 5 to 10 times.
Easier: Use your hands on the chair arms or your thighs to help you up. Or add a firm cushion to raise the seat.
Harder: Cross your arms over your chest. Or lower down more slowly, counting to 4.
Skip if: You have a recent hip or knee replacement and have not been cleared for this. With osteoporosis, keep your back straight and lean from the hips, not the waist.
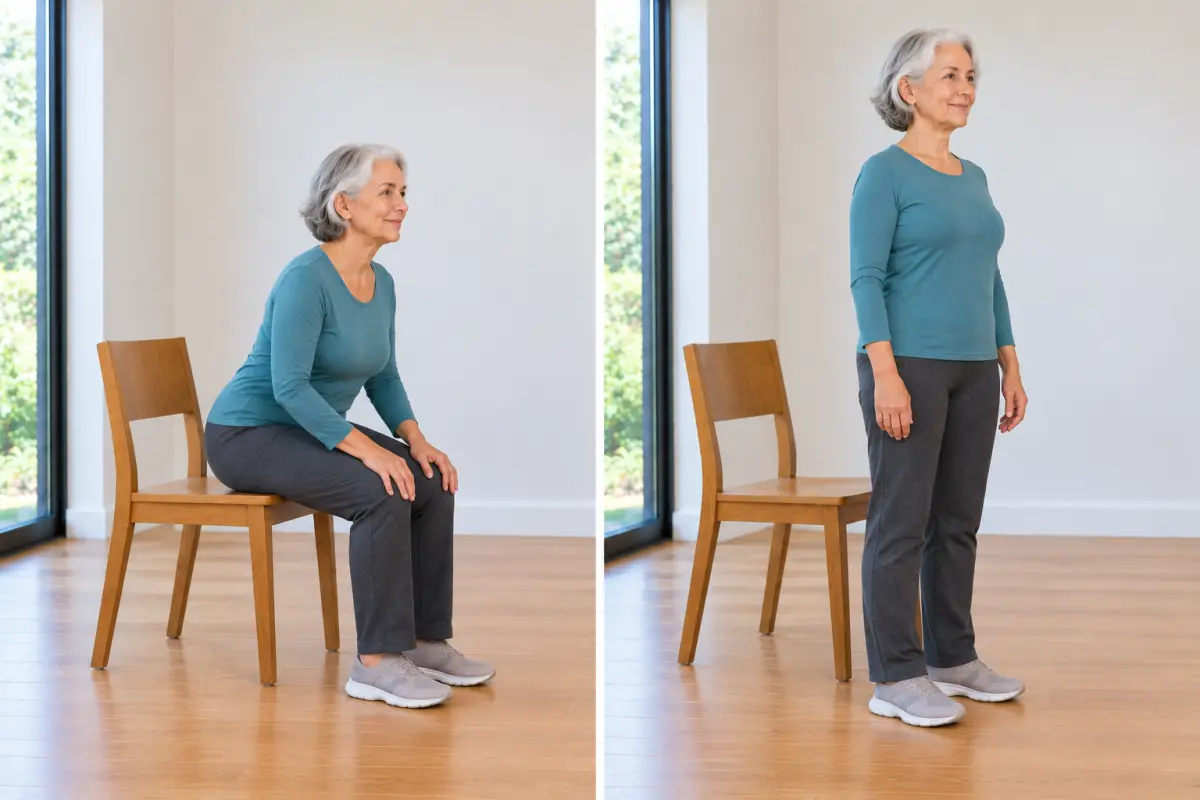
Left: seated at the front of the chair, leaning forward with a long back. Right: standing tall.
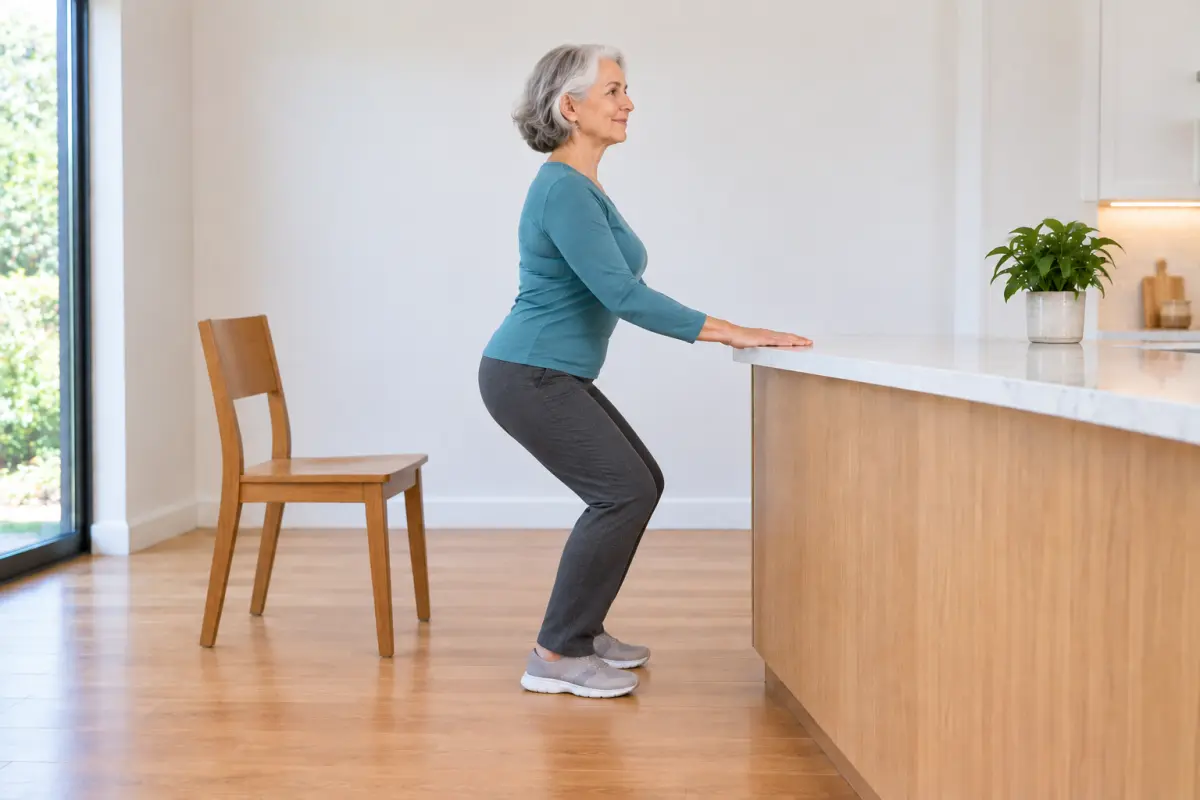
6. Counter mini-squat (supported Chair Pose)
A small, supported version of yoga's Chair Pose. It builds thigh and hip strength.
- Stand facing the counter, both hands on it, feet hip-width apart.
- Bend your knees and sit your hips back a few inches, as if starting to sit in a chair.
- Keep your chest lifted and your weight in your heels. Your knees should point the same way as your toes.
- Hold for 2 breaths, then press up to standing.
How long: 5 to 8 times.
Easier: Bend only slightly. Keep the chair behind you.
Harder: Go a little lower, or hold for 4 breaths.
Skip if: You have knee pain that gets worse. With osteoporosis, keep your back straight and do not round forward.
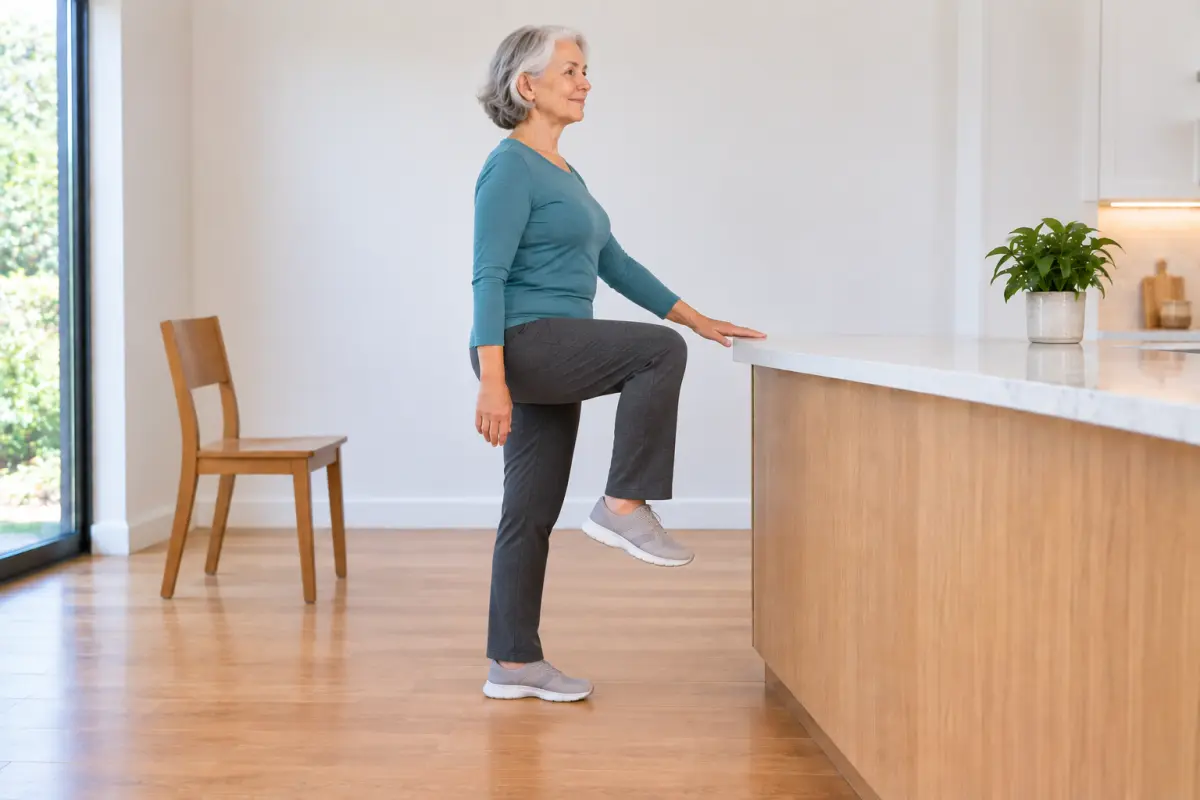
7. Marching in place
Lifting one foot at a time trains you to balance on one leg for a moment, as you do every time you take a step.
- Stand side-on to the counter with your near hand on it.
- Slowly lift your right knee a few inches, then lower the foot.
- Lift your left knee, then lower.
- Keep standing tall. Move slowly.
How long: 10 marches (5 each side), then turn around so your other hand is on the counter, and repeat.
Easier: Hold the counter with both hands and lift just your heel.
Harder: Lift your knee higher and pause for one breath at the top.
Skip if: You have a recent hip replacement and have not been cleared for hip bending.
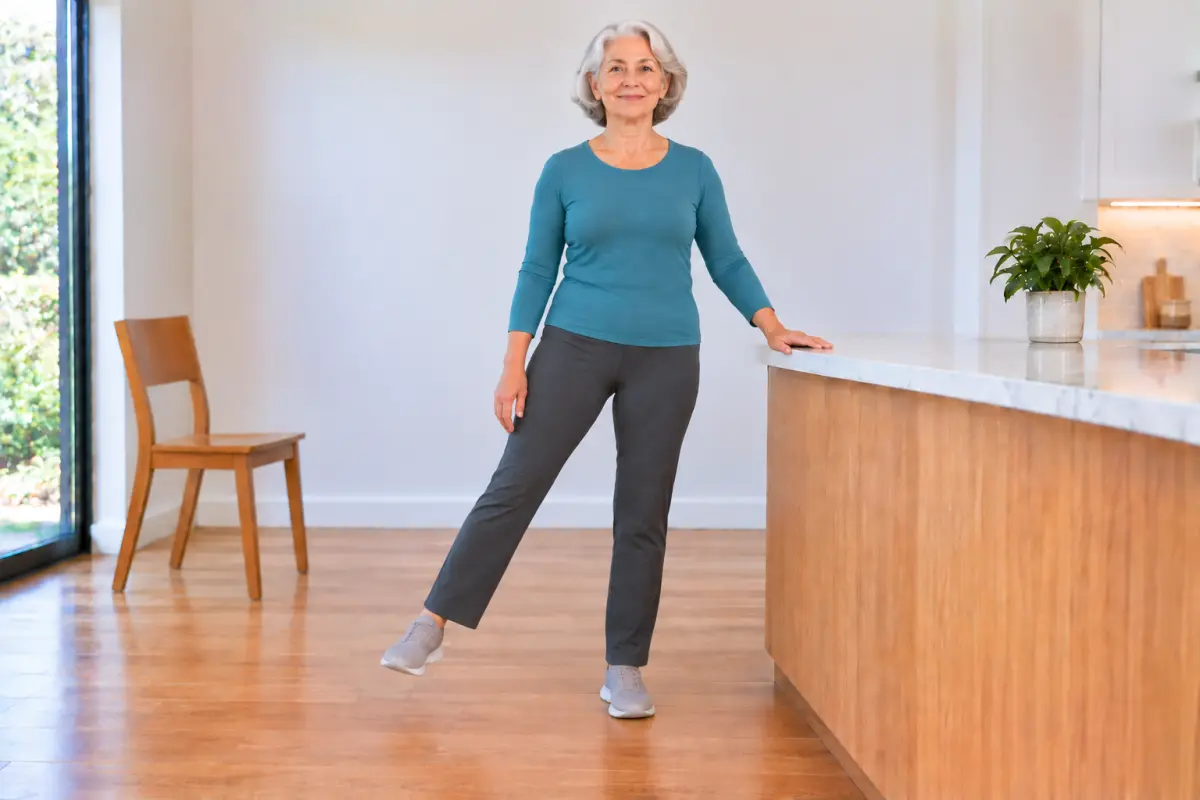
8. Side leg lift
Strong outer-hip muscles help keep you steady when you stand on one leg.
- Stand side-on to the counter, near hand on it.
- Shift your weight onto the leg nearest the counter.
- Keep your toes facing forward and slowly lift your outer leg out to the side a few inches.
- Lower it with control. Keep your body upright; do not lean.
How long: 5 to 8 lifts each side.
Easier: Slide the foot out along the floor instead of lifting it.
Harder: Hold the lift for 2 breaths.
Skip if: You have a hip replacement and your surgeon has limited this move.
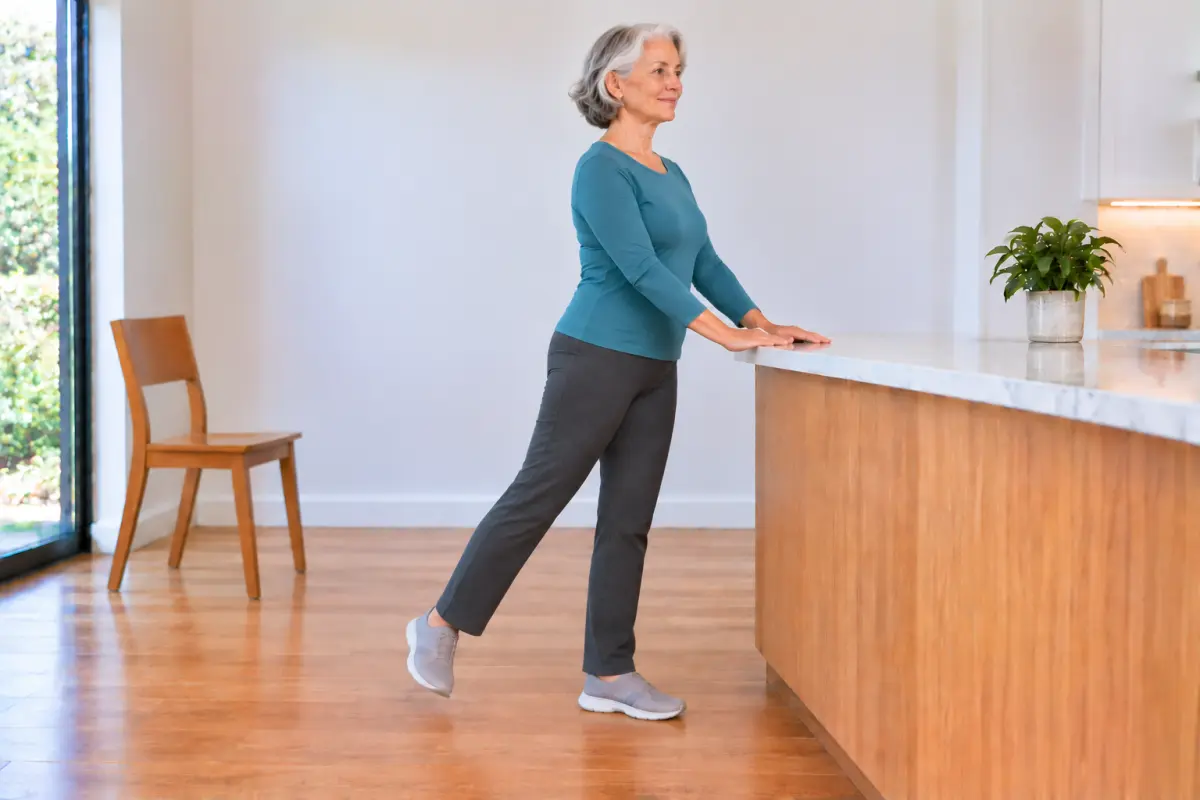
9. Back leg lift (Warrior III prep)
A very small, supported start toward yoga's Warrior III. It strengthens the back of the hips, which help you stand and walk.
- Face the counter with both hands on it.
- Shift your weight onto your left leg.
- Keeping your right leg straight, slowly move it back a few inches.
- Keep your back straight and your hips facing forward. Do not arch your lower back.
- Lower the foot.
How long: 5 to 8 lifts each side.
Easier: Just tap the toes of the moving foot on the floor behind you.
Harder: Lean your upper body forward slightly as the leg goes back, keeping a straight line from head to heel.
Skip if: Lower-back pain gets worse. With osteoporosis, skip the harder version.
10. Heel-to-toe stand (Tandem stand)
This is the same position as stage 3 of the CDC's balance check. It narrows your base so your balance has to work harder.
- Stand side-on to the counter, near hand on it.
- Place one foot directly in front of the other, heel touching toe.
- Look at a spot straight ahead at eye level.
- Stand tall and breathe.
- Switch so the other foot is in front.
How long: Build up to 30 seconds each side.
Easier: Leave a small gap between heel and toe, or place your feet slightly apart (like stage 2 of the check).
Harder: Use one fingertip on the counter, then let it hover just above.
Skip if: You feel dizzy. Do not try it with your eyes closed unless a physical therapist has shown you how.
11. Heel-to-toe walk along the counter
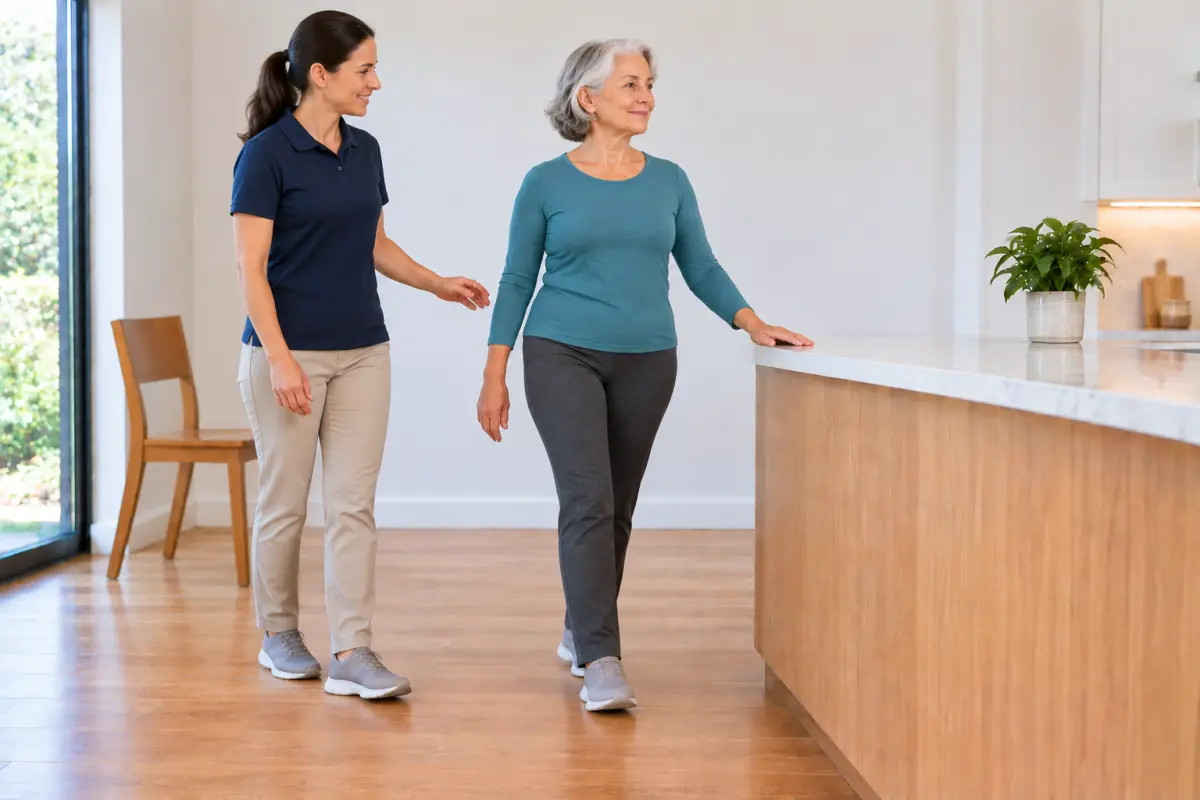
The CDC lists walking heel-to-toe as a balance activity. Here you do it with the counter right next to you.
- Stand at one end of the counter with your near hand on it.
- Step forward, placing your heel just in front of the toes of your other foot.
- Take 5 to 10 slow steps along the counter, sliding your hand as you go.
- Turn carefully, switch hands, and walk back.
How long: 2 lengths of the counter.
Easier: Take normal, narrow steps instead of heel-to-toe.
Harder: Pause for one breath on each step.
Skip if: Your counter is short or the floor is cluttered. Do this along a hallway wall with a helper instead.
12. Supported Tree Pose (one-leg stand)
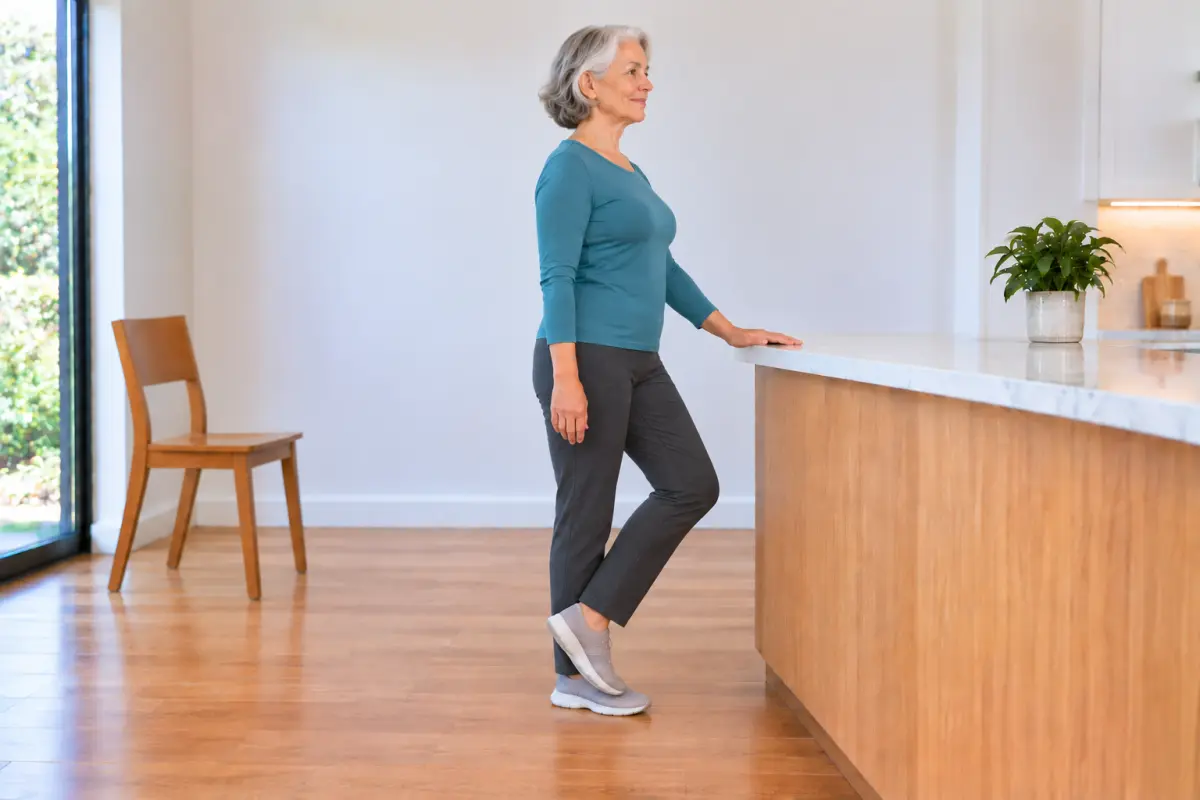
Standing on one leg is part of both the CDC check and the Harvard-described balance program. Tree Pose is the yoga version. See also our Tree Pose guide.
- Stand side-on to the counter, near hand on it.
- Shift your weight onto the leg nearest the counter.
- Turn your other knee out and rest that heel against the standing ankle, toes still on the floor (a "kickstand").
- Stand tall and look at a spot ahead.
- Return the foot to the floor and switch sides.
How long: Build up to 30 seconds each side.
Easier: Keep both hands on the counter. Or simply lift one foot an inch off the floor.
Harder: Rest the foot on the inside of the lower leg (never on the knee). Or lighten your hand to fingertips.
Skip if: You have a hip replacement and turning the knee out is not allowed for you. Lift the foot straight up an inch instead.
Your 15-minute balance routine (3 times a week)
Do this on 3 days a week, with a rest day in between (for example, Monday, Wednesday, Friday). The CDC suggests at least 2 days a week of muscle strengthening; this routine adds leg strength and balance practice to those days.
| Minutes | What to do |
|---|---|
| 0–2 | Warm up: Mountain Pose (Pose 1) for 5 breaths, then gentle ankle circles seated in your chair, 5 each way. |
| 2–4 | Side-to-side weight shifts (Pose 2), 5 each side |
| 4–6 | Heel raises (Pose 3), 8 times, then toe lifts (Pose 4), 8 times |
| 6–8 | Sit-to-stand (Pose 5), 5 to 10 times |
| 8–9 | Counter mini-squat (Pose 6), 5 times |
| 9–11 | Marching in place (Pose 7), then side leg lift (Pose 8), each side |
| 11–12 | Back leg lift (Pose 9), each side |
| 12–14 | Heel-to-toe stand (Pose 10), heel-to-toe walk (Pose 11), and supported Tree Pose (Pose 12), each side |
| 14–15 | Cool down: Sit in your chair. Breathe slowly for 5 breaths. Stand up slowly when you finish. |
Rest in your chair whenever you need to. Resting is part of the routine, not a failure.
Your 8-week plan
Go at your own pace. If a week feels hard, repeat it. Stay on the easier versions as long as you need.
| Weeks | Focus | How |
|---|---|---|
| 1–2 | Learn the moves | Do the easier version of each pose, both hands on the counter. Lowest number of reps. Hold balance poses 5 to 10 seconds. |
| 3–4 | Build strength | Use the main version of each pose. Middle number of reps. Hold balance poses 10 to 20 seconds. |
| 5–6 | Lighten your grip | Move from both hands to one hand, then to fingertips, in the poses that feel steady. Hold balance poses 20 to 30 seconds. |
| 7–8 | Add a challenge | Try the harder version of one or two poses each session. Keep your hand hovering just above the counter. |
Week 4 and week 8: Repeat the two self-checks with your helper and add them to your record.
On non-balance days, keep moving in other ways, such as walking. For gentle seated stretching on rest days, use the routine in our chair yoga guide.
Make your home safer
Balance practice works best alongside a safer home. The CDC recommends:
- Clear away things you could trip over, such as loose rugs, cords, and clutter.
- Install grab bars in and around the tub or shower and next to the toilet.
- Put railings on both sides of stairs.
- Improve lighting with more or brighter bulbs.
The CDC also advises:
- Ask your doctor or pharmacist to review your medicines, including over-the-counter ones, for any that cause dizziness or sleepiness.
- Get your eyes checked every year and keep your glasses up to date. For walks outside, ask about glasses with only your distance prescription, since bifocals and progressive lenses can make distances look wrong.
- Ask about vitamin D and osteoporosis screening.
When to see a physical therapist
A physical therapist can check your walking and balance in person and build a program just for you. Ask your doctor about a referral if you:
- Have fallen in the past year, or almost fallen
- Feel unsteady when walking, or use furniture to steady yourself around the house
- Are afraid of falling, or have started avoiding activities because of it
- Could not hold the heel-to-toe stand for 10 seconds in the self-check
- Needed your arms to get out of the chair in the chair-stand check
- Have dizziness or vertigo
The CDC's STEADI materials suggest that clinicians consider physical therapy for gait and balance exercises, or an evidence-based fall prevention program such as Tai Chi, for people who cannot hold the heel-to-toe stand for 10 seconds.
A note on healthy aging and yoga
The theme of the 2026 International Day of Yoga, observed by the United Nations and the World Health Organization on June 21, was "Yoga for Healthy Ageing." The idea fits this guide well: the aim is not just more years, but steadier, more independent ones. You do not need to wait for a special day to start. Fifteen minutes, three times a week, at your kitchen counter is enough to begin.
Where to go next
- Chair Yoga for Seniors: seated poses and a 28-day plan
- Mountain Pose guide
- Tree Pose guide
- Ankle Circles
- Find a yoga teacher in the US: NCCIH notes that learning from a qualified instructor is safer than learning on your own.
- Our editorial policy
Sources
- Centers for Disease Control and Prevention (CDC). Facts About Older Adult Falls. https://www.cdc.gov/falls/data-research/facts-stats/index.html
- CDC. Older Adult Fall Prevention: What You Can Do. https://www.cdc.gov/falls/prevention/index.html
- CDC. Physical Activity Guidelines for Older Adults. https://www.cdc.gov/physical-activity-basics/guidelines/older-adults.html
- CDC STEADI. Assessment: 30-Second Chair Stand (2017). https://www.cdc.gov/steadi/media/pdfs/STEADI-Assessment-30Sec-508.pdf
- CDC STEADI. Assessment: The 4-Stage Balance Test (2017). https://www.cdc.gov/steadi/media/pdfs/STEADI-Assessment-4Stage-508.pdf
- Youkhana S, Dean CM, Wolff M, Sherrington C, Tiedemann A. Yoga-based exercise improves balance and mobility in people aged 60 and over: a systematic review and meta-analysis. Age and Ageing. 2016;45(1):21–29. https://doi.org/10.1093/ageing/afv175 (PubMed: https://pubmed.ncbi.nlm.nih.gov/26707903/)
- Sivaramakrishnan D, Fitzsimons C, Kelly P, et al. The effects of yoga compared to active and inactive controls on physical function and health related quality of life in older adults: systematic review and meta-analysis of randomised controlled trials. International Journal of Behavioral Nutrition and Physical Activity. 2019;16:33. https://doi.org/10.1186/s12966-019-0789-2
- Cochrane. Exercise for preventing falls in older people living in the community (2019). https://www.cochrane.org/CD012424/MUSKINJ_exercise-preventing-falls-older-people-living-community
- National Center for Complementary and Integrative Health (NCCIH). Yoga: Effectiveness and Safety. https://www.nccih.nih.gov/health/yoga-effectiveness-and-safety
- Harvard Health Publishing. The act of balancing. https://www.health.harvard.edu/healthy-aging-and-longevity/the-act-of-balancing
- Harvard Health Publishing. The BEEP program: Keep your balance. https://www.health.harvard.edu/blog/the-beep-program-keep-your-balance-2020031019038
- Harvard Health Publishing. Safe exercise: Know the warning signs of pushing too hard. https://www.health.harvard.edu/pain/safe-exercise-know-the-warning-signs-of-pushing-too-hard
- Cleveland Clinic. Orthostatic Hypotension. https://my.clevelandclinic.org/health/diseases/9385-low-blood-pressure-orthostatic-hypotension
- Bone Health and Osteoporosis Foundation. Protecting Your Spine. https://www.bonehealthandosteoporosis.org/patients/treatment/exercisesafe-movement/protecting-your-spine/
- World Health Organization. WHO celebrates the power of yoga for healthy ageing (June 22, 2026). https://www.who.int/news/item/22-06-2026-who-celebrates-the-power-of-yoga-for-healthy-ageing
Want new practices by email?
We email now and then when we publish a new routine, practice or guide. No spam, unsubscribe any time.
Join the YogaMag newsletterFrequently Asked Questions
Popular posts
Related posts




No comments yet. Be the first to comment!