

Mountain Pose (Tadasana) — Complete Beginner Guide
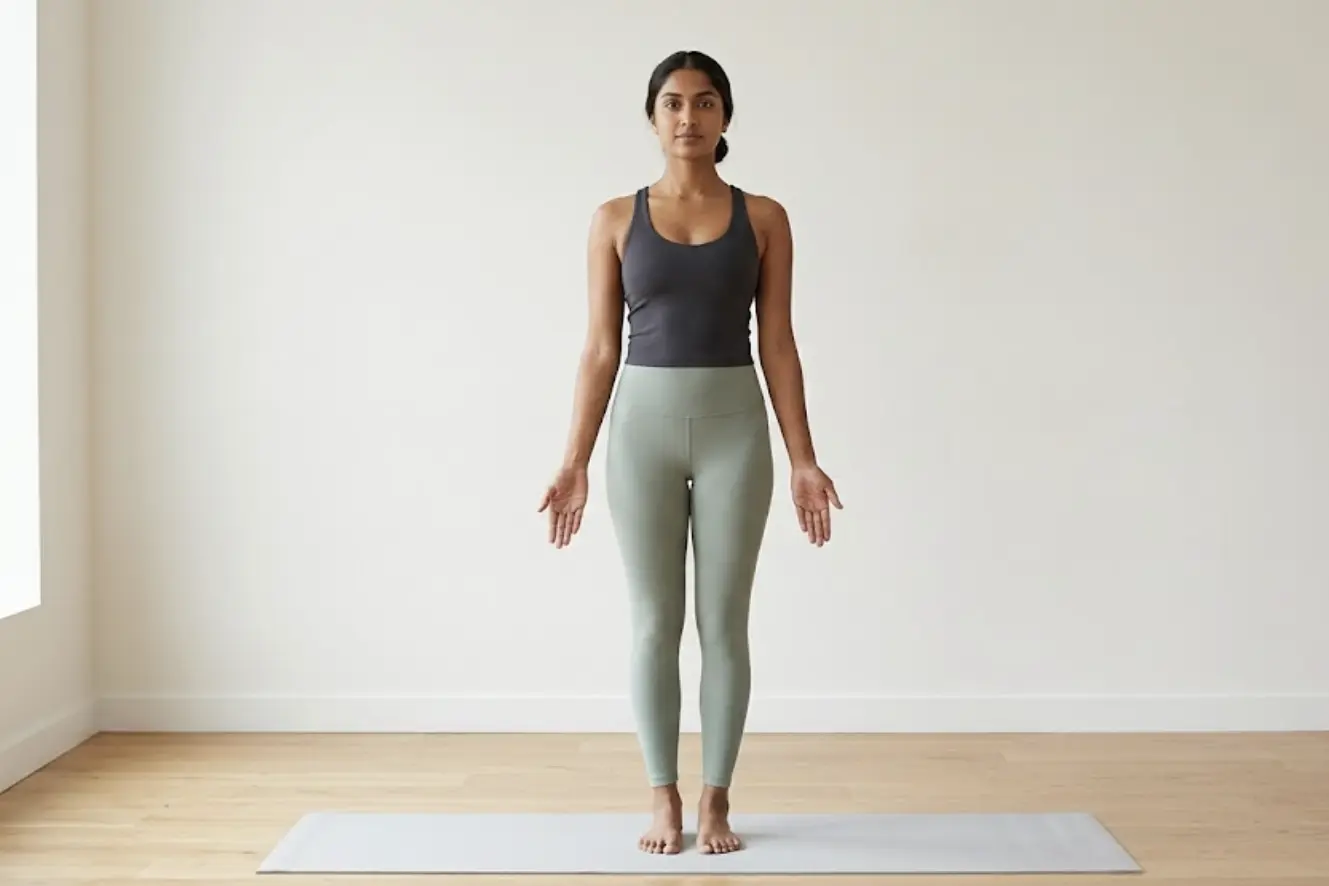
Sanskrit Name & Pronunciation
- Sanskrit: ताड़ासन (Tāḍāsana)
- Breakdown: Tāḍa = mountain; Āsana = seat or posture.
- Pronunciation: tah-DAH-suh-nuh (emphasis on the second syllable).
- Alternative Tradition: In the Ashtanga yoga tradition, this foundational posture is often called Samasthiti (suh-muh-STHI-tee), which translates to "equal standing" or "steady stillness."
Realistic Benefits of Mountain Pose
- Improves Postural Awareness: Builds conscious habit patterns that counter rounded shoulders, forward head tilt, and slouching from long desk hours.
- Strengthens Foot Arches & Ankles: Actively engages the intrinsic muscles of the feet and lower legs to build strong, stable ankles.
- Balances Weight Distribution: Corrects habitual leaning toward one hip, distributing body weight evenly across both legs.
- Encourages Neutral Spine Mechanics: Teaches you how to align your pelvis, ribcage, and skull without straining the lower back or neck.
- Gently Tones the Core and Quads: Activates the deep abdominal muscles (transversus abdominis) and thigh muscles without heavy physical strain.
- Promotes Calm, Grounded Focus: Anchors scattered mental energy through slow, diaphragmatic breathing and steady root-to-crown stillness.
How to Do Mountain Pose (Step-by-Step)
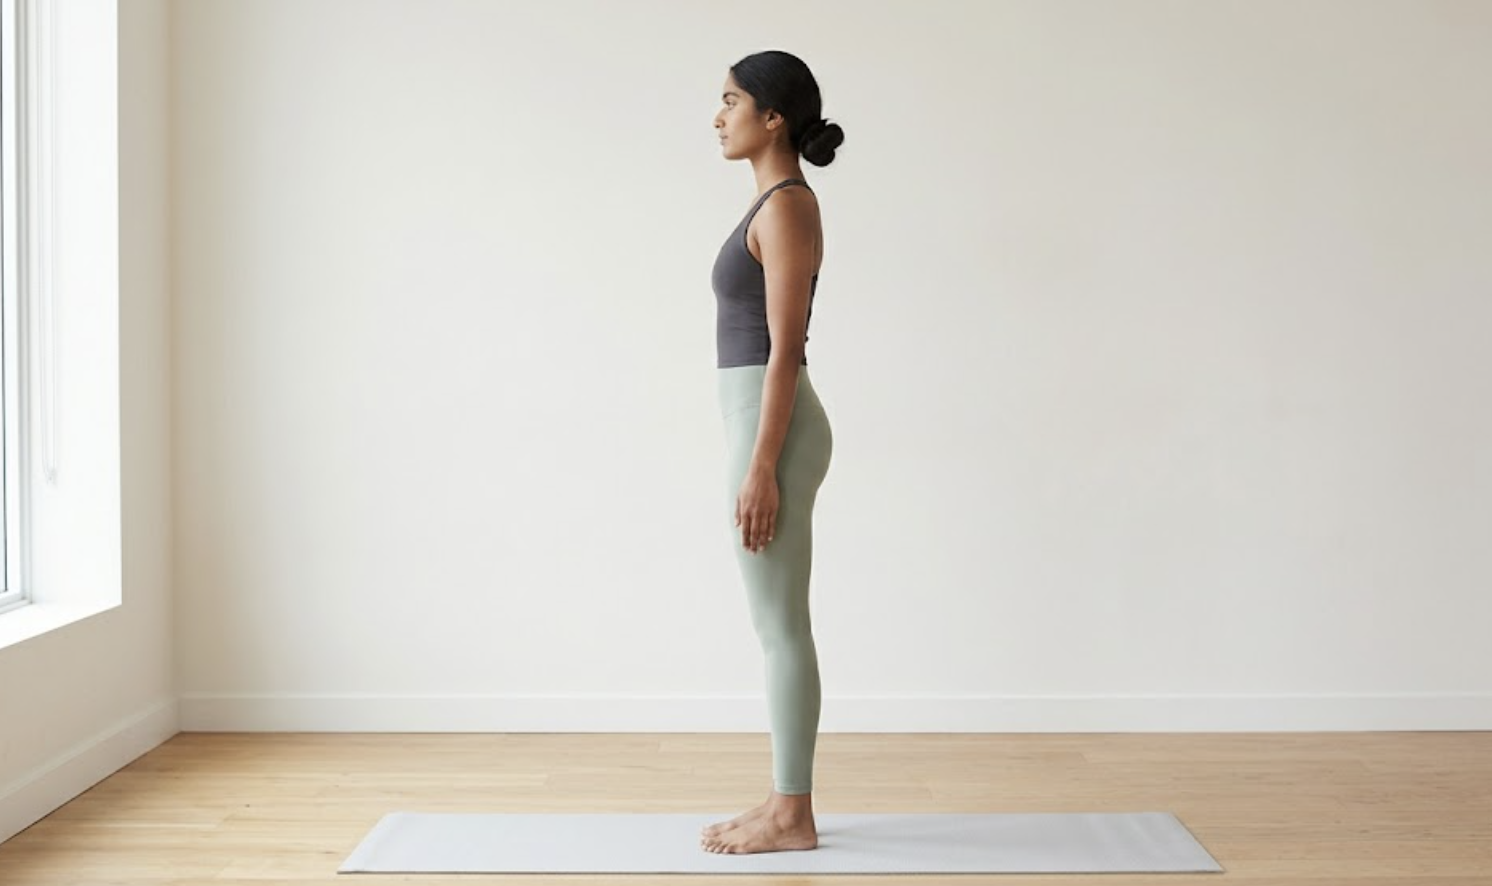
1. The Setup (Entering the Pose)
- Stand barefoot on a firm, level floor or yoga mat.
- Bring your big toes together with your heels slightly apart (about one inch), so your second toes are pointing straight forward. If this feels unsteady, keep your feet parallel and hip-width apart.
- Lift all ten toes off the floor, spread them wide, and place them down one by one.
- Press down evenly through the four corners of each foot: inner ball, outer ball, inner heel, and outer heel.
2. The Hold (Refining the Form)
- Engage your thigh muscles (quadriceps) gently to draw your kneecaps upward without locking your knees.
- Keep your pelvis in a neutral position: lengthen your tailbone slightly down toward the floor while lifting your lower abdomen gently in and up.
- Lengthen the sides of your torso and lift the crown of your head toward the ceiling.
- Roll your shoulders up, back, and down away from your ears, letting your collarbones widen naturally.
- Let your arms rest easily along your sides with palms facing forward and fingers naturally extended.
- Keep your chin parallel to the floor, ears directly over your shoulders, and fix your gaze on a stationary point at eye level.
- Maintain steady, rhythmic nasal breathing.
3. The Exit
- Take one final, deep inhalation to lengthen from your heels to the top of your head.
- Exhale smoothly and release the deliberate muscular engagement throughout your body.
- Shake out your legs, roll your shoulders a few times, and return to an easy standing position.
Alignment Cues by Body Part
- Feet: Root down through all four corners. Lift the inner arches slightly to prevent ankles from rolling inward (pronation).
- Legs: Maintain an invisible micro-bend in the knees to protect the joint capsules. Engage the thighs with a subtle inward rotation.
- Pelvis: Keep the pelvic bowl level. The front hip bones and pubic bone should sit on the same vertical plane.
- Spine: Maintain the natural curves of your spine (slight inward curve in lower back and neck; slight outward curve in mid-back) without exaggeration.
- Shoulders: Allow the shoulder blades to rest flat against your back ribs, moving down toward your waist.
- Arms: Extend active, relaxed arms with triceps lightly engaged. Keep elbows soft, not hyperextended.
- Gaze (Drishti): Soft, unblinking focus on a fixed point straight ahead. Keep your brow and jaw relaxed.
- Breath: Breathe in and out through the nose. Allow the lower ribs to expand 360 degrees on each inhale.
Common Mistakes and One-Line Fixes
- Locking the knees backward:
- Fix: Maintain a subtle micro-bend in your knees to keep your leg muscles active and joints safe.
- Over-arching the lower back (swayback):
- Fix: Draw your lower ribs in toward your spine and lengthen your tailbone toward the ground.
- Collapsing into the inner arches of the feet:
- Fix: Press firmly into the outer edges of your heels and lift the inner ankle bones upward.
- Hunching shoulders up toward the ears:
- Fix: Roll your shoulders back and slide your shoulder blades down toward your back pockets.
- Thrusting the chin forward:
- Fix: Slide your chin straight back slightly so your ears sit directly above the tops of your shoulders.
- Holding the breath:
- Fix: Keep your jaw unclenched and maintain a steady, audible 4-count inhale and 4-count exhale.
Modifications for Beginners

- Wide Stance (Hip-Width): If touching your big toes feels wobbly or pinches your lower back, separate your feet to hip-distance (about two fist-widths apart).
- Wall Alignment Support: Stand with your heels 2 to 3 inches away from a flat wall. Let your sacrum, upper back, and the back of your head touch the wall to learn true vertical alignment.
- Block Between the Thighs: Place a lightweight foam yoga block between your mid-thighs. Gently squeeze the block backward to activate your inner thighs (adductors) and stabilize the pelvis.
- Seated Mountain Pose (Chair Tadasana): Sit tall on the front edge of a sturdy, flat chair with your knees bent at 90 degrees and feet flat on the floor. Follow all upper-body alignment cues to build posture without bearing leg weight.
Safety and Modifications
- Low Blood Pressure or Lightheadedness: If you feel dizzy when standing still, practice with a wider base of support (feet wider than hips) or keep one hand touching a wall or chair back.
- Plantar Fasciitis / Foot Sensitivity: Practice on a supportive yoga mat rather than hard marble or tile, or use the seated chair modification to take pressure off the soles.
- Pregnancy (2nd and 3rd Trimesters): Take a wide, comfortable stance (shoulder-width apart) to accommodate your changing center of gravity and maintain stable balance.
- Acute Lower Back Pain: Avoid prolonged holds; soften both knees generously and focus on seated or wall-supported versions.
How Long to Hold & Practice Frequency
- Beginner Hold Duration: 30 to 60 seconds (5 to 10 slow, full breaths).
- Rounds per Session: 2 to 3 rounds at the start of a yoga sequence or as a grounding break between active poses.
- Daily Integration: Practice for 30 seconds anytime you are standing during daily chores—waiting for water to boil, brushing your teeth, or taking a break from your workstation.
Want a printable sequence?
Get one short practice each Sunday — no spam, cancel anytime.
Join the YogaMag newsletterFrequently Asked Questions
A.No. While classical alignment places the big toes together, standing with your feet hip-width apart is often more comfortable, anatomically natural for wider hips, and safer for balance.
A.Unlike casual standing where you lean into your joints and ligaments, Tadasana requires active micro-engagements from your feet, core, thighs, and spinal stabilizers, which quickly builds endurance.
A.Facing the palms forward helps externally rotate the upper arms and opens a hunched chest. Turning palms to face your outer thighs is also fine as long as your shoulders stay relaxed and broad.
A.No equipment is required. You can practice barefoot on any flat, non-slip surface, including clean tiled, wooden, or cement floors at home.
Popular posts
- 🧘♂️ 10 Best Free Meditation Apps to Reduce Stress and Anxi...
- 20 notable yogis and spiritual practitioners who lived more...
- Yoga Poses for Flexibility and Strength: Build a Balanced, S...
- Tantra Yoga for Beginners - A Complete Guide
- Beginner Yoga Poses with Pictures and Benefits: A Complete G...
- Easy Starting Yoga Poses for Daily Routine: Beginner-Friendl...
Related posts



No comments yet. Be the first to comment!